Posts

Add Custom Field to Checkout Woocomerce

If you are doing online business, you already know about the significance of a checkout page. Sometimes you might need to do customization on your eCommerce website due to specific requirements. In this tutorial, we will show you how to customize WooCommerce checkout page and add extra fields to it. Before jumping to the tutorial, let's find out what a checkout page is. What is checkout page? A checkout page is an eCommerce term that refers to a page shown to a customer during the step-by-step checkout process. Generally, it is the most important page for both seller and customer. Customers have to provide important pieces of information like addresses, billing details, payment method on this page. And if somehow this page produces an error, no customer will be able to make any purchase! So we can imagine how important this page is to the sellers. When you are using WordPress for powering your website and WooCommerce as your eCommerce solution, you also get your ow
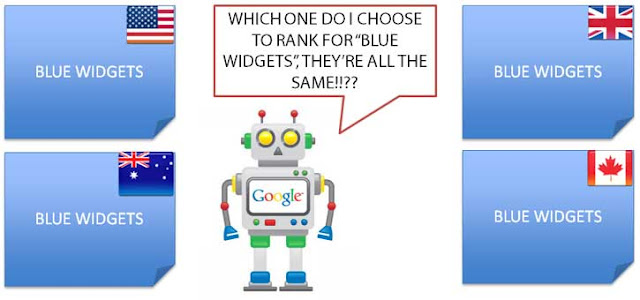

What is hreflang? and how it is useful for SEO?

Image
What is the Hreflang Attribute? Hreflang is an HTML <link> or <link> tag attribute that helps search engines to find the relationship between pages in different languages on your website. To serve the correct regional or language  Google uses the attribute  URLs in its search results based on the searcher’s country and language preferences. Concerning the SEO of an international website, hreflang is a need-to-know attribute. Where does it go? Google support tells us that the tag can be implemented in one of three ways (you only need to choose one).  > As a link in the HTML > In the HTTP header  > On the sitemap 1. As a link in the <head> of the page The hreflang attribute looks like rel="alternate" href=”(url here)” hreflang="x" ...with “x” being where you would place the language and country codes that dictate which webpage to show. Rel=”alternate” (similar to the rel=”canonical” tag) is a tag that tell

How to Setup Joomla In Your Local System

Image
Installing Joomla on a PC In this tutorial we will learn how to install Joomla on a local server. This tutorial covering installing joomla via WAMP. WAMP stands for "Windows, Apache, MySQL, PHP" which are the different elements that allow you to run Joomla on your computer. Here's how you do it: Step 1: Install WAMP in your local computer WAMP ServerDownload WAMP to your computer. Run through the WAMP installation process. In your taskbar, down the by the date in the bottom-right hand corner of your screen, look for the WAMP icon. Click on that icon. You should see a popup. Click "Start All Services" and then click "Localhost." Hopefully you'll see a white screen with the Wampserver logo in the top-left corner. Step 2: Download Joomla Joomla DownloadGo to Joomla.org and click on the black button saying "Download Joomla. Get the Latest Version". Find the line saying ".... Full Package" and cl

How to setup Outlook Email

Image
Introduction Outlook is a microsoft official pack that allows you to configure your email address into your local computer. Sometimes outlook might not proper install with your windows setup so you have to install it separately i.e with microsoft complete pack. Once you done installation follow these simple steps to configure email into your outlook. First you have to configure your gmail address Step 1 Step 2 Now go to forwarding and POP/IMAP tab In the IMAP Access section, select Enable IMAP. Step 3 Press save changes And move to outlook setup Step 1 Step 2 Step 3 Step 4 Step 5 Step 6 Step 7 Press more settings Step 8

How to Install Prestashop Beta Version

Image
How to Install PrestaShop 1.7 Theme (Beta version) Install via the Admin Panel Install via FTP Features of using Themler Themes on PrestaShop Permissions Install via the Admin Panel (packed template) To install the downloaded template (.zip) via the PrestaShop administration panel, please follow the next steps: Download the Themler theme archive. Go to the  PrestaShop back office  >>  Improve  >>  Design  >>  Theme & Logo . Click  "Add New Theme" . Import theme from your computer. Go back to  Improve  >>  Design  >>  Theme & Logo  and activate the newly installed theme with  "Use this theme"  option. NOTE:  Themler theme for PrestaShop 1.7 contains a  module  which is  required  for theme editing in Themler. The module will be installed and activated once you activate Themler theme. Then the Themler tab will appear on the PrestaShop back office ribbon. Go to  Improve  >&

Magento2 Installation – Getting Started

In this blog we are going to study simple steps of installing magento2 and the various options we have for installation. Getting Started There are different ways to install magento2, we are discussing a basic one here. This post is recommended and useful for beginners and advanced users, on which we will only learn the most simplest way of installation. You can chose two different methods 1. Installation with SSH/Terminal Access 2. Installation on shared hosting (without terminal access) Because magento2 has an rich set of commands in its new command line interface  magento2 is recommend to have a terminal access. Installation with SSH To install magento2 there are 2 repository’s which you can use 1. https://github.com/magento/magento2 2. https://github.com/magento/magento2-community-edition For advanced developers the first repository is recommended, if you are looking for module development etc. But if you just need to work with admin features etc the second rep